Step 2: Deposit your data
This step explains how to create a dataset in DataverseNO, describe it using metadata, upload your files, and submit the dataset for review.
Before continuing, make sure you have completed Step 1: Prepare your data.
In the following sections you will learn how to:
You do not need to perfect every aspect of the dataset before submission. Curators can help improve documentation, metadata, and other aspects of the dataset during the review process.
Create a user account
To deposit data in DataverseNO, you need a user account.
Researchers affiliated with Norwegian research institutions
If your institution supports Feide login for DataverseNO, a user account will automatically be created for you the first time you sign in:
-
Go to the DataverseNO repository.
-
Click Login and select your institution.
-
Under Your Institution, select Feide - Norwegian educational institutions.
-
Click Continue and follow the login procedure.
Researchers affiliated with institutions outside Norway
Researchers outside Norway can normally sign in using eduGAIN:
-
Go to the DataverseNO repository.
-
Click Login and select other.
-
Under Other options, click eduGAIN.
-
Click Log In with eduGAIN.
-
Click International provider (eduGAIN).
-
Follow the login procedure.
A DataverseNO user account will automatically be created when you sign in for the first time.
Sign in with ORCID
If you cannot use Feide or eduGAIN, you may be able to sign in with ORCID:
-
Go to the DataverseNO repository.
-
Click Login and select your institution.
-
Under Other options, click ORCID.
-
Click Create or Connect your ORCID.
-
Follow the login procedure.
Depending on your affiliation, additional steps may be required before you receive deposit access.
Linking your user account to ORCID
If you have logged into DataverseNO using Feide or eduGAIN, we recommend linking your DataverseNO user account to your ORCID account. Click your username in the top right corner, select Account Information, click Add Authenticated ORCID, and follow the instructions.
Need help?
If you are unable to sign in, do not receive deposit access, or are unsure which login method to use, contact your local user support.
Create a dataset draft
Once you have signed in:
-
Confirm that you are in the correct collection for your dataset. If not, navigate to the appropriate collection before continuing.
-
Click Add Data.
-
Select New Dataset.
A dataset draft will be created.
If you are unsure which collection to use, contact your local user support before proceeding.
Keep in mind
You can save and continue working on a dataset draft before submitting it for review.
Describe your dataset using metadata
Why metadata matter
Metadata help others discover, understand, cite, and reuse your dataset. Good metadata improve the visibility of your data both within DataverseNO and in external discovery services.
You do not need to complete every possible metadata field. Focus first on providing complete and accurate information in the most important fields.
Required metadata
The following metadata must always be provided:
-
Title.
-
Author(s).
-
Point of contact.
-
Description.
-
Subject.
-
Keyword(s).
-
Language.
-
Producer.
If applicable, information must also be provided in the following metadata fields:
-
Contributor(s).
-
Funding information.
-
Time period covered.
-
Date of data collection.
-
Data type.
-
Software.
-
Data source(s).
-
Geographic coverage.
Recommended metadata
To increase discoverability and reuse, and to support proper credit, we encourage you to also provide the following metadata where relevant:
-
Author identifier, preferably ORCID.
-
Related publication(s).
-
Related dataset(s).
-
Related material(s).
-
Geographic bounding box.
Domain-specific metadata
Where relevant, we also recommend the use of domain-specific metadata schemas. Currently available schemas include:
-
Social Science and Humanities.
-
Astronomy and Astrophysics.
-
Life Sciences.
-
3D Objects.
Guidance on common metadata fields
Title
The Title field is one of the most important metadata fields in the dataset. It is used in search results, citations, discovery services, and dataset landing pages.
A good title should:
-
Clearly describe the content of the dataset.
-
Be understandable to researchers outside the immediate project.
-
Avoid unnecessary abbreviations and internal project names.
-
Be specific enough to distinguish the dataset from similar datasets.
Example: Informative titles
- Bird observations from Northern Norway, 2018-2024
- Survey data on academic publishing practices among Norwegian researchers
Example: Less informative titles
- Dataset 1
- Final version
- Project data
If the dataset supports a publication, it is often useful to make this relationship visible in the title. This makes it easier for users to understand the relationship between the dataset and the publication.
Common prefixes include:
-
Supporting Data for:
-
Background Data for:
-
Reproduction Data for:
-
Replication Data for:
Examples:
-
Supporting Data for: Forest Fire Impacts on Global Soil Carbon Stocks.
-
Background Data for: Effects of Temperature on Arctic Plant Growth.
Title formatting
Do not add quotation marks around the title. Quotation marks will automatically be added when DataverseNO generates dataset citations.
Author
The Author field identifies the person or persons primarily responsible for creating the dataset. Accurate author information helps ensure that dataset creators receive proper credit and that the dataset can be linked to other research outputs.
Whenever possible, we recommend connecting authors to persistent identifiers for researchers and organizations.
Author names
When entering author names, you may either:
-
Look up the author via ORCID by typing the author’s name and selecting the correct match from the results list.
-
Enter the name manually if an ORCID record is not available.
In both cases use the format:
- Family name, Given name.
Example:
- Einstein, Albert.
Author affiliation
We recommend providing the author's institutional affiliation. Whenever possible, use the affiliation lookup linked to the ROR registry. This helps connect the dataset to the correct institution and improves consistency across research systems.
If the institution is not available through ROR, the affiliation may be entered manually.
Author identifiers
We strongly recommend connecting authors to ORCID whenever available.
ORCID helps:
-
Distinguish authors with similar names.
-
Link datasets with publications and other research outputs.
-
Improve attribution and discoverability.
If an author is entered manually, an identifier can still be added separately by filling in the fields:
-
Identifier Type: select identifier type, for example ORCID.
-
Identifier: insert the author's unique identifier, for example https://orcid.org/0000-0001-0002-0003.
Multiple authors
All individuals who have made a substantial contribution to the creation of the dataset should be listed as authors. Often that will be all or most of the authors of the related publication or manuscript. Contributions from individuals who do not meet the criteria for authorship may instead be recorded in the Contributor field.
Description
Provide a clear and concise description of the dataset. This description helps potential users quickly understand what the dataset contains and whether it is relevant to their needs.
To ensure consistency, we recommend aligning the Description field with the corresponding section of the README file. If relevant, you may adapt text from the abstract of a related publication, but make sure the description clearly describes the dataset itself.
We recommend that the description concisely summarises:
-
Purpose: What is the dataset about and why was it created?
-
Methods and study design: Briefly, how was the data collected/generated and processed?
-
Content and scope: What information does the data contain?
Where relevant, the description may also include information about the associated research project(s).
Keywords
Keywords help others discover your dataset through DataverseNO and external discovery services. They describe the main concepts represented in the dataset.
Where possible, use terms that are already widely used within your discipline. This increases the likelihood that potential users will find your dataset through searches.
Use keywords that describe:
-
The research topic or subject area.
-
Methods, techniques, or instruments.
-
Data types.
-
Study area or geographic location.
-
Relevant languages, species, materials, or populations.
-
Theoretical frameworks or disciplines.
Example: Useful keywords
- Linguistics
- Norwegian
- speech perception
- experimental data
- climate change
- Arctic
- oceanography
- temperature measurements
Example: Less useful keywords
- project
- dataset
- research
- study
We recommend that you enter at least 3-5 keywords. Each keyword should be entered in its own keyword field. Click the plus button to the right to enter more keywords.
Note that Term URI, Controlled Vocabulary Name and Controlled Vocabulary URL are not mandatory subfields and may be left empty.
Related Publication
Use the Related Publication field to link your dataset to articles, books, reports, dissertations, conference papers, or other scholarly outputs that are based on, supported by, or otherwise connected to the dataset.
If the dataset is associated with a publication, we strongly recommend adding a reference to that publication.
Creating explicit links between datasets and publications helps:
-
Increase the visibility of both the dataset and the publication.
-
Make it easier for others to understand the context of the dataset.
-
Support citation tracking and research impact assessment.
-
Strengthen the connection between research outputs and underlying data.
For each related publication:
-
Select the appropriate Relation Type. If the publication is based on, supported by, or draws on the data contained in the dataset, we recommend selecting Is Supplement To as the Relation Type.
-
Provide the full citation.
-
Add a Persistent Identifier (PID) where available, for example a DOI.
-
Provide the corresponding URL.
Where available, use the publication DOI rather than a publisher-specific URL.
If your dataset supports a publication, the Related Publication section may look similar to the example shown below.
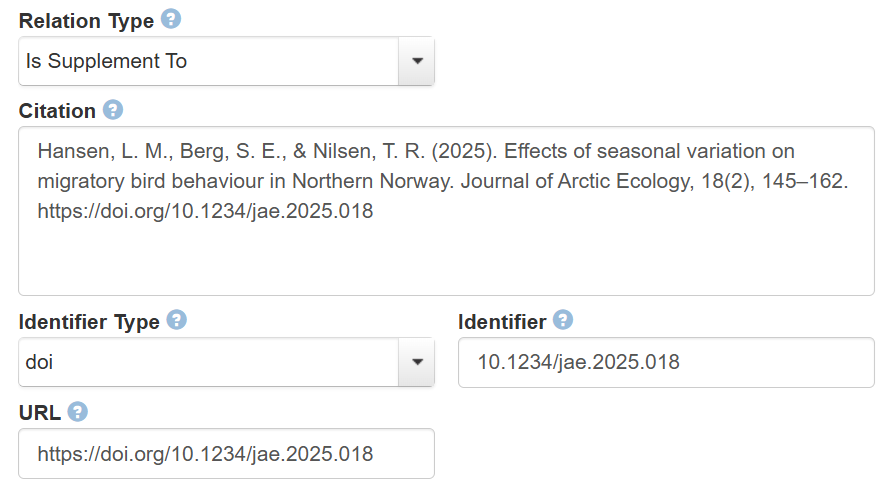
The Related Publication field is used to link the dataset to a publication that uses or describes the data.
Manuscripts under review
If a manuscript has been submitted but has not yet been accepted for publication, you may still add information about it. However, you should avoid including information that could compromise anonymity during peer review. Do not list the name of the journal or publisher. Instead, you may write “Submitted for review”, “In preparation”, or similar.
Example: Correct manuscript reference
- Hansen, L. M., Berg, S. E., & Nilsen, T. R. (2025). Effects of seasonal variation on migratory bird behaviour in Northern Norway. In preparation
Example: Incorrect manuscript reference
- Hansen, L. M., Berg, S. E., & Nilsen, T. R. (2025). Effects of seasonal variation on migratory bird behaviour in Northern Norway. Submitted to Journal of Arctic Ecology
Double-blind peer review
If the related manuscript is being evaluated through double-blind peer review, indicate this in the Related Publication field or inform your curator. This allows the curation team to assist with preparing an anonymized dataset version if required and to support secure sharing with editors and reviewers.
Multiple related publications
A dataset may be related to more than one publication. Examples include:
-
A dataset supporting several journal articles.
-
A dataset linked to both a dissertation and one or more articles.
-
A dataset reused in subsequent publications.
In such cases, add all relevant publications.
Need more metadata guidance?
Detailed field-by-field instructions are available in the DataverseNO metadata guide (link coming).
Choose terms for reuse
Every dataset must have a licence or terms of use that explain how others may reuse the data. The most appropriate licence depends on the nature of the data and any rights or restrictions associated with source material.
Recommended licence
In most cases, DataverseNO recommends CC0 (Creative Commons Zero). This maximizes reuse and visibility while supporting open science practices.
Alternative licences
If CC0 is not suitable, you can open the Terms tab to select another standard licence:
If none of the available licences fit your situation, contact your local user support.
Indigenous communities’ collective rights
Remember to explicitly acknowledge the Indigenous community’s collective rights over the data in the dataset documentation. Include information both in the README file and the metadata, e.g. in the Contributor field.
Upload your files
Once your files and documentation are ready, upload them to the dataset draft.
Uploading individual files
-
Open the Files tab.
-
Click Upload Files.
-
Select the files.
-
Save the dataset.
Uploading folders
If your files are organized in folders and subfolders and you wish to preserve that structure in DataverseNO, use the Upload a Folder option.
Select the folder that contains all files and subfolders you want to upload.
For example, suppose your files are organized like this:
MyData
├── 00_README.txt
├── Measurements
│   ├── station_01.csv
│   └── station_02.csv
└── Documentation
    └── codebook.pdf
If you want the dataset to contain:
├── 00_README.txt
├── Measurements
└── Documentation
you must select the folder MyData during upload. The top-level folder that you select, MyData, is not itself recreated in the dataset. Only its contents are uploaded.
After selecting the folder, DataverseNO will display a preview of the files that will be uploaded.
Review the preview and make sure:
-
The expected files are present.
-
The folder structure appears correct.
-
The README file is included.
When ready, click Start Uploads. Large uploads may take some time to complete. Wait until the upload process has finished and you receive confirmation that all files have been uploaded successfully.
Afterward:
-
Close the upload window.
-
Refresh the dataset page if necessary.
-
Verify that all files appear in the dataset.
To view the folder hierarchy, switch from the default file list view to Tree View.
Common problems
The folder structure is missing
Most often this happens because the wrong folder was selected. Make sure you select the parent folder that contains the files and subfolders you want to upload, not one of the subfolders themselves.
The files do not appear immediately
Large uploads can take time to process. Wait for the upload confirmation message before closing the upload window.
The README file is difficult to find
To make the README file appear near the top of the file list, we recommend giving it a name such as 00_README.txt.
File and dataset recommendations
To ensure smooth upload and reuse:
-
An individual file should preferably not exceed 100 GB.
-
A single upload should preferably not exceed 200 GB.
-
A dataset should preferably not exceed 5 TB.
-
A dataset should preferably not contain more than 300 files.
Larger datasets
Larger datasets can often be accommodated. If your dataset exceeds the recommendations above, contact your local user support before uploading.
Keep in mind
If you provide both a preferred preservation format and an original working format, use identical file names except for the file extension. Example: experiment_01.csv and experiment_01.xlsx.
Embargo period
DataverseNO is an open data repository, meaning all uploaded files must be publicly accessible. However, if properly justified, you may temporarily restrict access to files for up to 2 years using an embargo.
During the embargo period:
-
The embargoed files will not be accessible.
-
The dataset metadata and README file will remain visible and accessible.
Embargoes expire automatically on the specified end date, after which the files will become openly available. If you need to make changes to the expiration date, please contact DataverseNO repository management. Be aware that the embargo period cannot be extended beyond 2 years after initial publication of the dataset.
Please note
Embargoes should not be used as a means to restrict access to a dataset associated with a publication under review. Instead, we recommend coordinating the dataset release with the publication of the article. In such cases, all steps in the deposit and curation process need to be completed in advance.
Share your dataset before publication
If you need to share a dataset before publication, for instance with collaborators or peer reviewers, please contact your local user support, who will create a preview URL that you can share.
If the related manuscript is being evaluated through double-blind peer review, please inform us directly or indicate it in the Related Publication metadata field.
This allows the curation team to assist with preparing an anonymized dataset version if required and to support secure sharing with editors and reviewers.
Submit your dataset for review
When your metadata and files are ready, click Submit for Review.
Please be aware that your dataset has not yet been published. It will first need to be reviewed by a curator.
Curators do not evaluate the scientific quality of the research itself. Curation is a support process intended to help prepare data for publication and reuse.
A curator will contact you as soon as possible after your dataset has been submitted for review, usually within three working days.
Read more about the curation and publication process in Step 3: Publish your data.
Urgent cases
If your dataset is associated with a publication deadline, grant deadline, or another time-sensitive activity, please contact your local user support directly. They can help assess the situation and, where possible, coordinate an expedited review process.
Need help?
If you are unsure about any part of the deposit process, contact your local user support.
Ready for the next step?
When the dataset is submitted, a curator from your local institution will review it. Read more about the curation and publication process in the next step: